Once installed, the initial site needs some pages and a menu, as well as a header to have a minimal site ready to use. It is a good idea to just setup a simple site first, then play with content and pages before continuing the creation of the real content.
Step 1 – Create some pages
Create a page called “Home” and add placeholder text. Publish the page and then create another one called “About Us” with placeholder text and publish that page too. Create one more page called “Contact Us” and publish as well. Once you have a few pages, you can setup a menu and set your home page in theme settings.
Step 2 – Set Home Page
From the admin dashboard in WordPress, select Appearance – Customize. Go to Homepage Settings and where is asks for Your homepage displays, select the A static page option. Select your Home page from the list. Click the Publish button at the top to save changes. Use the X to close out of customization options.
Step 3 – Setup the Menu
From the admin dashboard in WordPress, select Appearance – Menus. Initially you will not have a menu, it will prompt you to create one and may include all the pages. At the top where it says Menu Name, enter a simple name, I normally use Main as the name of the main menu.
Use the options to add / remove menu items. See the little icon that shows more options for each menu link.
Press Create Menu to create the menu. Then find where it asks for Display location and select the primary checkbox, then Save Menu.
Now if you view your site, you will have a site with a menu, but no header, footer or optional sidebar setup, that is next.
Step 4 – Clear Defaults for Header, Footer and Sidebar
From the admin dashboard in WordPress, select Appearance – Widgets. Here you will see sections for the Sidebar, Footer and Header. Each of these is a mini editor that allows you to use content blocks to create content for each section.

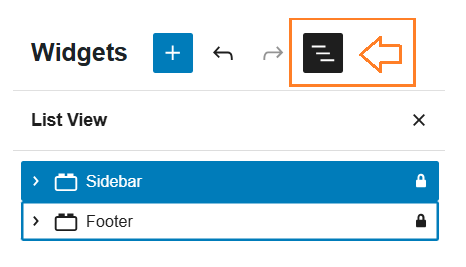
Click the List View icon, shown below, to see the sidebar, header and footer content.

Clear existing content
Open the sidebar section and clear any content if there are default options, which there often are.
To do this, select all the entries and hit the delete button on keyboard or use the … button and select delete from the menu.
Once the content is clear, you are ready to add your own content.
Step 5 – Setup Header, Footer and Sidebar
Since the header, footer and sidebar use normal content blocks. If you have not been through the content creation guide yet, don’t worry – we are going to start with a simple header only and come back later to complete the rest.
Add a header by opening the Header section. Click the big button with a plus, this is a the “add block” button.

It will pop down a little menu, type ui image and select the UI Image block from the list.

Upload an image suited for a top header and select it.
Optionally use the Image Size on the right to set the size right and maybe center it.

Click the Update button in upper right to save change.
Final Step – View your site
The site won’t look great yet, but it is “roughed in”. Next step is to learn how to build content, then you can come back and add more to the header, footer and sidebar.

In the upper left corner of the WordPress admin dashboard, see the Home page link and the name of your site. Hover over that and the Visit Site pop down menu will take you do your content site.
